Share

This post is another offshoot from Too Fast, Too Curious and if you haven’t read that one, start there. It lays the foundation of how we built Metronome’s MDR (Design x AI) program, our AI-assisted workflows, and the role of "vibe coding" in unlocking speed and autonomy across the Metronome product.
In this piece, we're zooming in. Less theory, more practical walkthrough of how we actually vibe over here at Metronome.
How do real AI-powered fixes go from feedback to production? What does a clean, scalable vibe-coded change actually look like? And how does a designer (or PM or SA) ship quality code without being an engineer or compromising the sanity of your engineers.
We'll break down the entire flow, start to finish, using the guidance and best practices we've created for our own team to consume.
Best practices checklist
We've made our fair share of mistakes testing this out. But over time, we've landed on a set of principles that help us keep things moving without breaking too much of the system (or our engineers' trust). These are the habits we’ve built up the hard way, lots of trial, error, and some rightfully opinionated feedback from our engineers.
These best practices frame our day-to-day work. They set boundaries, reduce risk, and help contributors vibe responsibly. You'll see them in action throughout the walkthrough below, but they're just the scaffolding: you'll still need real-time judgment, healthy engineering relationships, and a willingness to learn along the way:
- Check for existing issues: Before starting a new idea or creating a new ticket, review the already existing feedback to see if your problem is already logged. Even better, find a product partner here. At Metronome, we aggregate feedback from across design, product, and GTM into central repositories in Linear. This step helps reduce duplicate efforts and sets the tone: vibe coding is still coding. It should follow the same rigor and traceability. It also forces a moment of prioritization: are you solving something urgent, or just vibing because it's fun? Both are valid, just be honest.
- Avoid deep backend changes: Most of our vibe-coded changes start and stay in the frontend. If your idea dips into backend territory (GraphQL, auth logic), check with an engineer first. It's not about gatekeeping, it's about trust. Early bugs we created understandably met with friction from our eng team, so now we either break the ticket into FE/BE parts or co-author with an engineer from the start. We're slowly creeping into backend territory as our comfort grows, but we do it deliberately.
- Keep it small: One properly sized ticket, one PR. That's the rule. Smaller changes are easier to review, easier to test, and easier to revert. Early on, we got overeager and shipped large, multi-part changes. AI tooling doesn't help here. It's scary good at sprawling your scope. We countered that by standardizing prompts and implementing stricter limits. Bonus: Going small makes batching and feature flagging easier when you're working on system-wide migrations (like we are with our design system).
- Align with the design system: If you’re tweaking components, double check that you’re following the design system rules. Use AI to audit spacing, naming, and patterns or ask the design team for a quick gut check. This prevents small changes from introducing larger inconsistencies.
- Request design review at PR stage: Before pushing your PR, tag the design team in Slack. At Metronome, because our Design System is in mid migration, our Figma MCP isn’t fully wired yet, so this is a human process. Design reviews are our opportunity to teach, align on system patterns, and ensure people aren’t operating in a vacuum. Until your design system is deeply codified, this step is essential.
- Test your code aggressively: Use Cursor and Claude to simulate edge cases and validate component behavior. We’ve built prompt templates that help contributors write and run tests even if they aren’t engineers. Lean into those.
- Engineering MUST review all PRs: This one’s nonnegotiable. All PRs require engineering review, no matter who writes the code. When we first opened the vibe-coded floodgates, things got chaotic. Design and SA-led PRs introduced bugs. Our eng partners rightfully pushed back. Now, we have a system: if you want to vibe to experiment, go all out to your heart's content. If you decide to push it live into the product, you vibe with guardrails. Engineers still own the keys to production. We’re exploring new workflows to reduce friction, but that core trust mechanism isn’t changing anytime soon.
Note: Our new “problem” is actually a good one: we’re shipping so fast that tickets now pile up waiting for review and deployment. That’s the goal, but it does create an imbalance. We made a Faustian bargain with Eng: they hold the keys to production, and we can’t return the favor by reviewing their code. It’s an unequal setup we’re actively trying to balance. For now, shipping meaningful frontend improvements is our best return. But we’re working on process changes to keep the pipeline clean and the relationship healthier.
These practices are the scaffolding, but the best way to understand them is to see them in action. So, let’s walk through the anatomy of a real vibe-coded fix: how one piece of feedback turns into tested, production-ready code in under a day.
Part 1: From feedback to plan
One-liner feedback is everywhere in Slack threads, Gong calls, user interviews, your PM's stream of consciousness. The difference between good vibe coding and chaotic vibe coding is what happens in the first 10 minutes. Most people see feedback and immediately start coding. That's where bugs are born.
Capture and Context
Let's say this lands in your #design-feedback Slack channel:
"The spacing on the billing summary page looks weird when there's only one item."
Tempting to dive in, right? Don’t.
Instead, convert that into a Linear ticket using the Slack integration. This preserves the full conversation thread and pipes it into the context window that Claude and Cursor use later.
Add screenshots if they don't exist. Ask the person to share their screen or browser details. Scope the impact: Is this happening for all users? Specific plans? Which environment?
.avif)
Define before you design
Fire up Claude with a planning prompt:
Reference ticket DESIGN-[NUMBER]. Review this ticket, take a moment to understand the requirements, and reference our documentation to come up with the ideal solution approach.

Based on this feedback, what should we implement? Provide 2-3 potential approaches.
Create an implementation plan
Once you’ve reviewed the options, ask Claude to write a full implementation plan:
Put together a detailed write-up with our implementation plan. Include:

1. Clear objectives and requirements
2. Technical approach and architecture decisions
3. Step-by-step implementation instructions
4. Detailed instructions that an AI agent (Claude Code/Cursor) could interpret to create a structured development plan
5. Highlight any edge cases we should be mindful of. Recommend ways to test or validate the work once complete..avif)
Use the linear MCP or paste this plan back into the Linear ticket. Now you have documentation, traceability, and a roadmap that any engineer can review.
Part 2: Choosing your AI tool
Not all AI coding is the same. Over time, we've learned when to reach for Claude versus when to fire up Cursor.
Use Claude for big picture planning:
- Architecture decisions ("Should this be a new component or extend existing?")
- Cross-file changes that require understanding relationships
- Complex logic that needs reasoning through tradeoffs
- Initial solution exploration and approach comparison
Use Cursor for targeted implementation:
- Single-file CSS adjustments
- Component prop updates
- Specific function modifications
- Quick UI polish tasks
.avif)
The handoff: Start planning in Claude, then move to Cursor for focused implementation. Claude helps you think through the approach; Cursor helps you execute it cleanly.
Part 3: Implementation with visual guidance
From your planning phase, open Claude or Cursor to begin implementation. Pull down the Linear ticket via MCP, and use your planning doc to kick off the session.
Pull down ticket DESIGN-[NUMBER]. Review the ticket, understand the requirements, and ask any questions to help you better frame the context.

Then analyze our codebase and come up with 2-3 solutions for how we can implement this. Provide pros and cons for each approach, but don't implement anything yet.

Additional constraints:
- Prioritize using existing solutions within our codebase to avoid technical debt
- Prioritize lean, minimal implementations
- Avoid creating specialized flows unless absolutely necessary
This gives the AI a chance to reason through tradeoffs before it starts typing. You'll often get one approach that aligns with your constraints and design system, one that's faster to ship but may lack something, and one that's over-engineered.
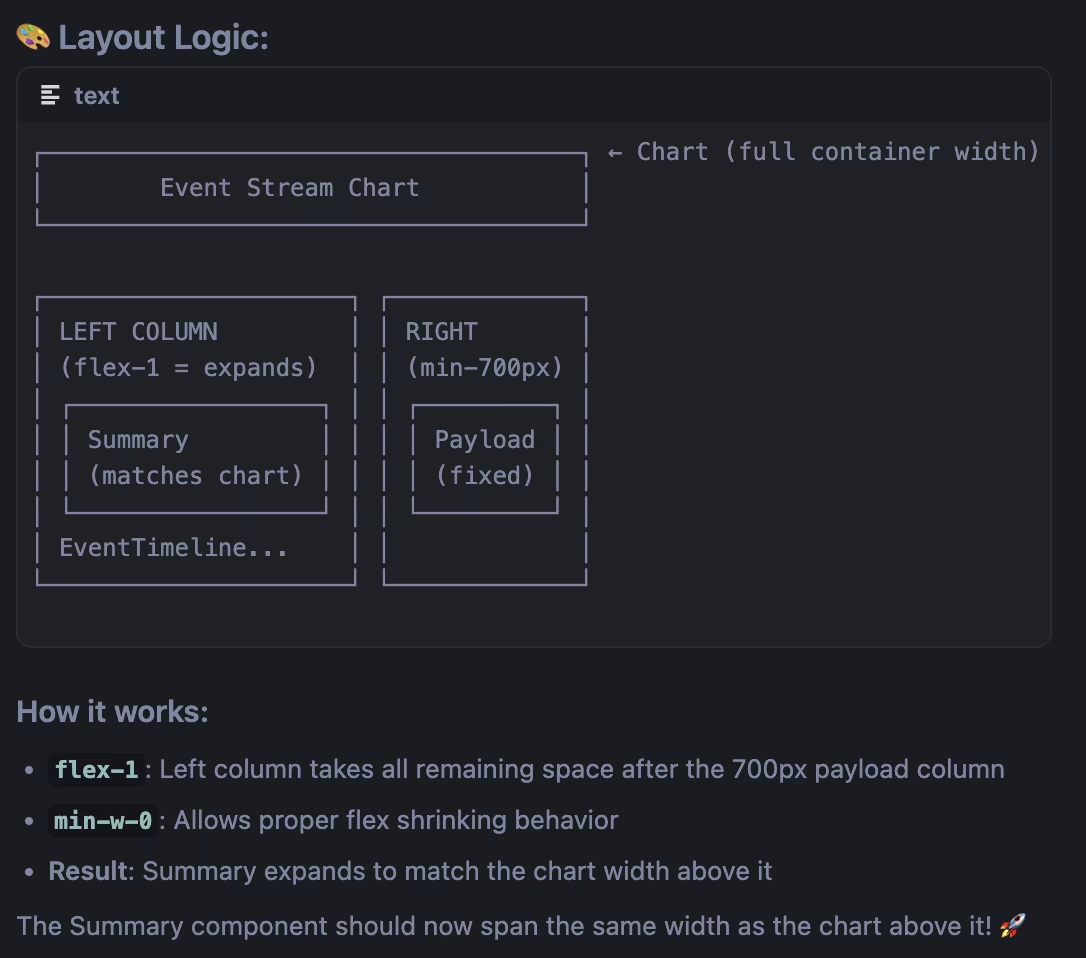
When AI doesn't get placement right
Sometimes AI gets confused about where elements should go. Here's our secret weapon: ASCII art.
Instead of saying "put the button below the form," try this:
Looking at this layout:
┌─────────────────┐
│     Header      │
├─────────────────┤
│   Form Fields   │
│   [ Input 1 ]   │
│   [ Input 2 ]   │
│                 │  ← Put the button here
│                 │
└─────────────────┘

Where do you think the submit button should go?
This visual approach cuts down on the back-and-forth significantly. AI responds much better to visual representations than verbal descriptions of layout placement.Pick your path. Let Cursor implement it.
Visual guidance is a two-way street. Visually explain your intent and ask the same from the agent.
Part 4: Review, optimize, and ship
Once you have a working solution, don't stop. Ask Claude to do a code review and propose improvements:
Review all the code changes you've made. Analyze the solution we implemented and determine if there's a better way we could implement this that follows good engineering practices.

If improvements are possible, give me the pros and cons of this new improvement. If the current solution is optimal, explain why it's the cleanest approach.
If improvements are needed, determine if they match your goals. If not, commit your working solution and move on to PR.
Before submitting your PR, generate a clean description:
Write a pull request summary that includes:
- What the implementation does
- What changed in the codebase and why we went with this approach
- How to test the change (with steps)
Bonus: Record a Loom demo showing what you changed, how it behaves, and how to test edge cases.
Part 4.5 Uniquely Metronome: Evolving how we test and stage
Here’s the thing: even with a clean PR, we noticed two consistent bottlenecks. First, a lot of vibe-coded fixes ended up sitting in limbo waiting for merge. Second, some changes needed more time to “bake” in testing before we felt confident pushing them forward. Rather than let good work stall out, we set up new pathways with engineering to give design-led contributions the right room to run.
The first change was making QA Wolf regression testing a hard requirement. Every PR we ship is run through regression, which keeps the safety net tight even as contributions expand beyond the core eng team.
The second change was spinning up three new staging environments just for design:
- Experiments (
design/experiments): the wild west for free-form ideas. Push limits, try things, break things—no judgment. Think alpha staging. - Research (
design/research): a more controlled space for testing flows and hypotheses. Great for usability tests or demos with tighter guardrails. - Design (
design/main): a shared staging area where we can merge features engineering isn’t ready to pull into main yet. Useful for sharing concepts with Sales/SA, or letting eng preview how a proposed solution should actually work.
Each of these environments is long-lived and continuously updated from main, so we’re always working against the latest product state. The upshot is speed without chaos: designers can push fixes, test prototypes, and stage future ideas without overloading the main pipeline.
This system isn’t a must-have for every company, but it’s a reflection of where we are and what we needed. For us, it’s been a way to keep contributions moving while keeping production safe.
Why this works
By now you can see that vibe coding isn’t just about writing code with AI; it’s about building the ecosystem around it. While they might seem like side quests at first blush, tighter review cycles, MCPs, QA Wolf, and dedicated design environments are the guardrails that let us move faster without losing trust.
That’s the real unlock: you don’t need to be an engineer to ship meaningful improvements, but you do need the structure. Vibe coding provides that framework. It takes messy feedback, shapes it into a ticket, and gets it all the way into production-ready code.
For us, this lets our design team:
- Close UX polish gaps that would otherwise sit in backlog
- Respond faster to client feedback
- Experiment with improvements without waiting for engineering cycles
- Learn how the product actually works under the hood
The goal isn't to replace engineers but to empower designers to contribute more meaningfully to the product while building better relationships with engineering through structured, thoughtful contributions.
Stay tuned.
This is part of an ongoing series about AI-assisted design and development at Metronome. Previous: Too Fast, Too Curious. Next: Building a Vibe Coding Prompt Library.